The computer hard drive is a means of storing system and user data in particular. Sometimes, it is necessary to divide information into some large sections to avoid confusion. It is recommended to install the system on one partition, and user files, programs, etc. save to others. When purchasing a new PC, most often the hard drive is not divided into local disks (partitions), so you need to carry out this operation yourself. Let's look at how to properly partition a hard drive. For example, we will use Windows 7, which is the most stable among current versions (Windows 8, 10).
Before you begin the process of partitioning your disk, we recommend that you familiarize yourself with the following tips:
- For the OS, allocate at least 50-60 GB of free space, otherwise you will not see normal system operation. Of course, if you have a hard drive of 100-200 GB, then allocating that much space is too troublesome, but for systems starting from the “seven” you need enough memory.
- It is also better to take care of the path for saving files for the browser and torrent client; it is better to set the path for uploading files for them not on the system drive (by default), but on another more capacious partition. You should also understand that desktop content takes up space on the system disk.
- If you have a hard drive up to 1 TB, divide it into 3 partitions, if from 1 TB to 2 TB, divide it into 4 partitions, and more than 4 TB into 5 partitions. This is explained by the fact that when downloading large files to the hard drive, optimal division will allow it to be written correctly.
- Do not use all available memory on your hard drive. It is necessary to leave some space “in reserve” to restore damaged clusters.
If you follow these tips, you can set up hard drive partitioning once and not worry about it again until you decide to expand the memory on your computer.
How to partition a hard drive in Windows 7?
To partition the hard drive, we will use a standard tool in the Windows operating system. It's called "Disk Management". To open this utility, you need to do the following:
Now let's move on to how to partition a hard drive in Windows 7. The instructions are as follows:

How to partition a hard drive in Windows 8, 10
Using Windows 7 as an example, we looked at the partitioning process. There will be nothing fundamentally new in the “eight” and “ten”, so you can use this procedure for this system as well. The only exception is that we will slightly adjust the tips to complete the task correctly:
- For the system disk, leave (add) at least 70-80 GB of information. Starting with “seven”, the system writes information about the current state to the local disk so that you can use system recovery if necessary. In addition, after many updates (including up to 8.1, 10), large files are formed that are protected by the system;
- Divide the disk into several partitions, do not leave 2 partitions. This will make it more convenient for you to handle files that are recorded on your hard drive, logically structuring them into sections.
How to partition a hard drive in Windows 7, 8, 10 using third-party programs
What to do if you don’t trust the standard tool for working with local disks? We suggest using a third-party application Partition Wizard. This application is free, does not require much space and is stable. Of course, its functionality is far from Acronis Disk Director, but it will be just right for partitioning a hard drive.
So, first, download it and then install it in a convenient location on your computer. When the program is installed, run it and wait until it loads the necessary information about your system and hard drive.
An unallocated partition will be designated as "Unallocated". Right-click on it and click "Create".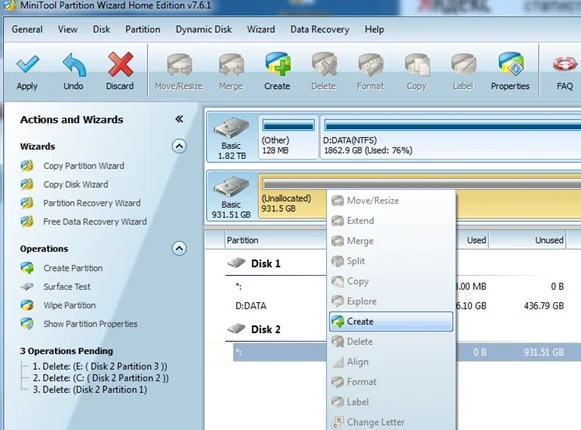
When you run this command, you will need to provide the following information in the next window:
- Section title;
- Partition type (for example, logical);
- Drive letter;
- File system type;
- Volume.
Please note that in the case of the program that is built into the system - “Disk Management”, these operations are performed in different windows, but here, for convenience, everything happens in one window. For example, we created a new “Test” section with 400 GB on board. Once created, the file system looks like this:
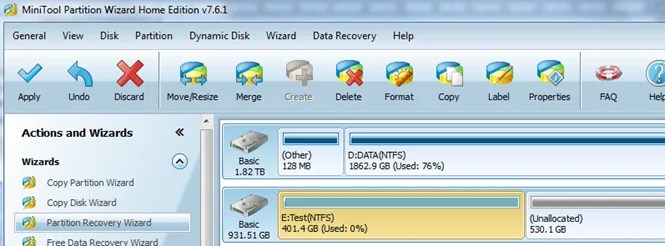
This process can be repeated as many times as you like until you run out of free unallocated space. Please note that it is very important to leave very little free space so as not to damage the hard drive. To create another new partition, simply repeat the instructions. Don't forget to save your progress using the Apply button.
As you can see, the process of dividing a disk into partitions is not complicated, but very simple if you approach the issue with instructions from our website.
It is very common that the entire disk on computers/laptops is used as one volume C, it would seem there is nothing wrong with this, but if you want to reinstall the system, you will have to transfer your personal data to an external drive and only then reinstall it, and if If there was a second partition, you could save everything on it (or better yet, store personal information on drive D from the very beginning) and safely reinstall the system without touching the second partition with personal data. Or if you want to install a second system, you will also need a separate partition for it. In this article I will describe step by step how to split one disk into two or more in Windows 8.1.
So, we have a computer/laptop with one drive C. The goal is to divide/split/cut off the disk space from it and make another drive (drive D). Let me immediately explain that you can split not only drive C, but also other drives (D, E, etc.), the procedure is no different from splitting drive C.
In order to work with partitions (delete, create, change), you need to go to Disk Management, for this you can right-click on "This PC" shortcut - "Control" - "Disk Management" or right-click on the icon " Start"- choose " Disk Management".
 |
 |
Right-click on the partition that needs to be partitioned/partitioned, in this case it is drive C and select " Compress volume..."

After this, a window will open in which you need to specify the size of the new local disk. In field "Size of compressed space (MB)" indicate the size of the new local disk being created (by default, half of the disk or the maximum possible will be indicated). Don’t forget you indicate in Megabytes, let me remind you 1 Gigabyte = 1024 Megabytes, i.e. if you want to indicate 100 Gigabytes, you need to write 102400 Megabytes, if 200 Gigabytes - 204800 Megabytes, etc.. In this example, I indicate 100000 MB ( in the end I will get 97.6 GB). After specifying the size of the new disk, click "Compress".

On the resulting unallocated space, right-click and select " Create a simple volume".

In the Simple Volume Creation Wizard that opens, read what it is needed for and click " Further".

In the next window, specify the location for the new volume, by default the maximum possible is indicated, you can leave it, click " Further".


The next window shows formatting settings, you can leave the default and click " Further".

After this, the Completing the Simple Volume Wizard window will appear, check if all the settings are correct and click " Ready".
- How to partition a hard drive in Windows 8 using tools built into the operating system, without resorting to third-party programs? A 750 GB hard drive standard for placing partition tables “GUID Partition Table” or GPT. Nowadays, almost all laptops sold come with a UEFI BIOS and the Windows 8 operating system installed on a GPT disk. I have never dealt with a GPT disk before. So I’m asking you: Is it possible to partition it in the same way as a simple hard drive of the old MBR (Master Boot Record) format through the “Disk Management” utility built into Windows? What is the general difference between GPT and MBR disks? Sorry if my question to you seems lame, but I don’t want to spoil anything on the new laptop. Maxik.
- Hello admin! I installed the Windows 8 operating system on my computer, I want to divide the disk into several partitions, is it possible to use your article “” as instructions? In my opinion, the difference between seven and eight is small. I have a simple system unit on which I installed Windows 8. My BIOS is UEFI, but in it I enabled the extended UEFI mode - Legacy OpROM and the hard drive, therefore, MBR.
- Hi all! How to correctly divide a hard drive into partitions when installing Windows 8? If I create one drive C: and install the operating system there, will it be possible to create several more drives for storing data after installation?
How to partition a hard drive in Windows 8
Hello friends, in the first part of this article we will divide the GPT partition table format hard drive into several partitions. The Windows 8 operating system is installed on your computer. By the way, if you have a laptop with Windows 8 installed, read our article.In the second part of the article, we will partition the old MBR (Master Boot Record) format hard drive. The computer also has the Windows 8 operating system installed. All this is very simple and the process in both cases will proceed absolutely the same, but there is still a slight difference and I will show it to you.
- Note: If this article does not help you, for example you can't separate from drive C: enough space to create drive D:, then be aware that the hard drive on a laptop can be divided not only using the Disk Management utility built into the operating system. Also disk D: You can create using a free program (and in Russian)
- There is also a good free program, EaseUS Partition Master Free Edition, which has more powerful capabilities than Disk Management. Read our new article. Or you can use a paid program.
What is the difference between GPT and MBR disks?
If you bought a new laptop, then it will probably have a UEFI BIOS and the Windows 8 operating system installed on a GPT disk.
The partition table (GPT, GUID Partition Table) was developed specifically to solve problems encountered with disks using the old MBR (Master Boot Record) boot record.
On old MBR format disks it is not possible to:
1) Create partitions larger than 2 TB. If you have a 3TB hard drive, then no matter how you divide it, you will still have about 750 GB of unallocated space. If you bought a 3 TB hard drive, immediately convert it to the GPT partition table format.
2) It is impossible to create more than four primary partitions; the fourth partition will have to create an extended partition that can accommodate logical partitions, details are further in the article or read in more detail here “”
3) Such disks have poor protection from viruses; there are special malicious programs that modify the master boot record.
How to determine whether your hard drive is GPT or MBR.
We go to Disk Management, in the disk properties, in the “Volumes” tab, we see that the Partition Style is Table with GUID, that is, GPT.
You may ask me: “If a GPT disk has so many advantages, why, in fact, many users do not like the fact that almost all modern laptops have a GPT partition table on their hard drive.” The answer is: “They just didn’t like the new Windows 8 operating system, and reinstalling Windows 8 to Windows 7 on such a laptop simply won’t work, this is due to certain difficulties described in our article:.
How to partition a hard drive GPT in Windows 8
So, if Windows 8 is installed on your laptop or desktop computer, and the hard drive is in GPT format, dividing it into as many partitions as you like is as easy as shelling pears, there is no specific limit on the number of primary partitions that you will see when we partition the hard drive MBR format disk.
We right-click in the lower left corner and select Disk Management, we see this situation. This is my 120 GB SSD solid state drive, we will divide it into partitions. In your case, the hard drive may be larger, but you need to do everything in the same way as described below.

First partition: hidden, 300 MB in size, healthy (Recovery partition), this partition contains Windows 8 download files, do not touch this partition under any circumstances.
Second partition: hidden, 100 MB Healthy (Encrypted (EFI) system partition), this partition also cannot be touched, but even if you wanted to, you won’t be able to.
Third partition: Good (Main partition) volume 111 GB. It contains the installed Windows 8 operating system, that is, the C: drive itself. So I want to divide it first into two sections, and then into three.
Right-click on the C: drive and select Shrink Volume.

Disk C: divide it approximately in half - select 45 GB and click Shrink,

The unallocated area appears, right-click on it and select Create simple volume.

Leave the size as is.

A letter is automatically assigned to the new drive; you can assign it yourself if you wish. Further.


Ready.

Please, there is a new volume D:

Since our hard drive is a GPT disk format, you can create as many partitions as you need using the method described above without any problems.


Even in this case, you can partition the hard drive in Windows 8. Right-click on the C: drive and select Shrink Volume.


Unallocated space appears. We create a simple volume and that’s it.


How to partition an MBR hard drive in Windows 8
If you just bought a desktop computer and, without delving much into your BIOS, without specifically looking for UEFI parameters, installed Windows 8 on it, most likely your hard drive is in MBR format.

To split the disk into partitions, we do everything as described above, but with a slight difference. Look at the screenshot, we can pinch off space from the C: drive or the E: drive. Let's pinch off 25 GB from drive E, Shrink the volume.


Unallocated space will be created, convert it to a partition. Create volume.

A so-called “Additional partition” is created, in which we can create many logical drives.

The inconvenient thing is that if we need to create another section, we can only create it in the “Additional section”. This is the limitation on creating primary partitions on hard drives that use the old MBR (Master Boot Record) boot record.
01 Jun
How to create a hard drive partition in Windows 8
Many PC users use the system partition of the hard drive on which the operating system is installed to store data. And in addition to storing various media files and photographs on it, they also store important documents without thinking about their possible loss. This guide provides a detailed look at creating hard drive partitions using standard Windows 8 tools.
First, let's look at why splitting a hard drive into several partitions?
You need to partition your hard drive in order to store important data and various files not on the system drive, but on the partitions you created, which will prevent data loss in the event of a failure, reinstallation of the operating system, or infection of the system drive with viruses.
And so, let's start creating hard disk partitions using standard Windows 8 tools.

Screenshot 1.
To open the built-in application "Disk Management" in Windows 8, press the keyboard shortcut Win + X, for Windows 8.1 you can right-click on the button "Start" and in the context menu, click "Disk Management"(See Screenshot 1).

Screenshot 2.
After that, an application for working with hard drives will open (see Screenshot 2), with its help you can format hard drives and partitions, delete partitions, change drive and partition letters, and also create new hard drive partitions and more.

Screenshot 3.
In the application "Disk Management"(see Screenshot 3), right-click on the hard drive or partition that has enough free space. To create a new section, click the button in the context menu "Shrink Volume".
Note: By default, when installing Windows, the system partition is assigned a drive letter (C:). When distributing free space between the new partition and the drive (C:), we recommend that you allocate additional free space for the drive (C:) beyond what the operating system occupies at the time the new partition is created. Since Windows creates temporary files, memory dumps, etc. while running. For example, if your hard drive has a capacity of 500 Gigabytes, then you can allocate 70 Gigabytes of disk space for the drive (C:), and use the rest of the space to create new partitions.

Screenshot 4.
In the window with disk space distribution parameters, to the new hard drive partition, in the line "Size of compressible space" specify the required space for the new partition and click the button "Compress"(see Screenshot 4). After which a new section will be created (see Screenshot 5), on which you need to right-click and click the button in the context menu "Create Simple Volume".

Screenshot 5.
In the Create Simple Volume Wizard window, click "Further", in line "Simple Volume Size" if you are not going to create multiple partitions, leave the default volume size and click the button "Further".
In the window "Assigning a drive letter or path", highlight the item "Assign drive letter A-Z" and specify the desired drive letter, then click the button "Further".
In the window, highlight the item "Format this volume as follows"(see Screenshot 6).

Screenshot 6.
In points: "File system", please indicate: NTFS; "Cluster size", please indicate: Default, check the box "Quick Format" click the button "Further", and in the next window click the button "Ready", after which a new disk partition will be created.
Categories: , /Disk space management is a useful function with which you can create new volumes or delete them, increase the volume or, conversely, reduce it. But not many people know that Windows 8 has a standard disk management utility, and even fewer know how to use it. Let's look at what you can do using the standard Disk Management program.
There are several ways to access disk space management tools in Windows 8, as in most other versions of this OS. Let's look at each of them in more detail.
Method 1: Run Window
Using a keyboard shortcut Win+R open dialog box "Run". Here you need to enter the command diskmgmt.msc and click "OK".

Method 2: "Control Panel"
You can also open the volume management tool using Control panels.


Method 3: Menu “Win + X”
Use a keyboard shortcut Win + X and in the menu that opens, select the line "Disk Management".

Utility features
Volume compression

Creating a Volume

Changing the partition letter

Formatting a volume

Removing a volume
Deleting a volume is very simple: right-click on the disk and select "Delete volume".

Section expansion

- Total volume size—full disk space;
- Maximum available space - how much the disk can be expanded;
- Select the size of the allocated space - enter the value by which we will increase the disk.

Convert disk to MBR and GPT
What is the difference between MBR disks and GPT? In the first case, you can create only 4 partitions of up to 2.2 TB in size, and in the second - up to 128 partitions of unlimited size.
Attention!
After conversion you will lose all information. Therefore, we recommend creating backup copies.
RMB click on the disk (not the partition) and select "Convert to MBR"(or in GPT), and then wait for the process to complete.

Thus, we looked at the basic operations that can be performed while working with the utility "Disk Management". We hope you learned something new and interesting. And if you have any questions, write in the comments and we will definitely answer you.